Few months ago, we did a major revamp in CurdBee UI. In this revamp we decided to make use of autocomplete on several data heavy inputs to improve the usability. We assumed any existing JavaScript autocomplete plugin could be easily modified to suit to our requirements.
Unfortunately, that wasn't the case. None of those plugins were comprehensive and flexible enough to cover the cases we had in our hand. Here are some of the issues we faced with the existing plugins:
- They introduced whole bunch of new dependencies.
- They didn't support custom filtering algorithms.
- You cannot modify the HTML of results (also, styling the plugin generated markup becomes a nightmare).
- You cannot specify what to do when there are no results.
So I had to write a custom jQuery based autocomplete plugin to suit the requirements of CurdBee. Later, I used this same plugin on several other hobby projects with slight modifications.
At this point, it made me realize this could be something that can be useful for others too. After couple of weeks of free-time hacking, I'm ready to introduce you to the Smart Autocomplete plugin!
First of all, I suggest you to check different use cases of the plugin by visiting the demo page. If those examples pumps you, read on!
Basic Usage

Using Smart Autocomplete on your projects is easy. Only dependency it has is for jQuery core library. Make sure you have the latest jQuery core version (1.5 or above), if not you can download it from here.
To get the Smart Autocomplete plugin visit its GitHub page.
Once you have downloaded both jQuery and the Smart Autocomplete plugin, reference them in the header of your page like this:
  <script src="https://ajax.googleapis.com/ajax/libs/jquery/1.5.1/jquery.js" type="text/javascript"></script>
  <script src="jquery.smart_autocomplete.js" type="text/javascript"></script>
Now, define an input field to use for autocomplete.
  <div>
    <label for="fruits_field">Favorite Fruit</label>
    <input type="text" autocomplete="off" id="fruits_field"/>
  </div>
To enable autocompletion on the text field, you must select it using jQuery and call the smartAutoComplete method on it:
  $(function(){

   $('input#fruits_field').smartAutoComplete({
    source: ['Apple', 'Banana', 'Orange', 'Mango']
   });

  });
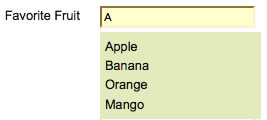
As you can see in the above example, only required option is the source. Source defines the set of values that will be filtered when user starts typing on the field. Source can be either an array or a string specifying a URL. If you specify a URL, filter function will send an AJAX request to that URL, expecting a JSON array as a response (check Example 2).
You will also need to add couple of styles to display the results correctly.
    ul.smart_autocomplete_container li {list-style: none; cursor: pointer; margin: 10px 0; padding: 5px; background-color: #E3EBBC; }
    li.smart_autocomplete_highlight {background-color: #C1CE84;}
Once you complete the above steps, your text field will have autocomplete capabilities.
Power of One-liners
Though Smart Autocomplete comes with sensible defaults, you can easily customize the default behavior by setting couple of one-line options.
If you check the Example 2, you will notice the autocomplete field is defined as follows:
    $("#country_field").smartAutoComplete({
      source: "countries.json",
      maxResults: 5,
      delay: 200,
      forceSelect: true
    });
Apart from the required source field, it has 3 other options defined. The maxResults option sets the maximum number of results to be shown; delay option sets number of milliseconds plugin should wait (after user enters a key) before calling the filter function.
By setting forceSelect option to true, you can block free-form values in the autocomplete field. This means user have to either select a value from the given suggestions or the field will reset to blank.
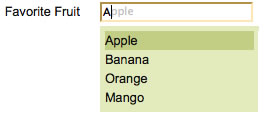
You must have seen how Google Instant Search completes rest of the phrase in gray, with the best matching result. It's possible to implement similar behavior with Smart Autocomplete too.

  $("#type_ahead_autocomplete_field").smartAutoComplete({
    source: ['Apple', 'Banana', 'Orange', 'Mango'],
    typeAhead: true
  });
All you got to do is to set typeAhead option to true. Isn't that easy?
You can find all available options of the plugin in the README.
Define your own Filtering Algorithm
Smart Autocomplete plugin gives you the flexibility to override the built-in filter function with a custom function. Custom filter function should return an array of results or a deferred promise, which returns an array on resolve. If you call jQuery Ajax methods, those will return an object containing a promise by default.
In the 5th example, we use Quicksilver like filtering to filter the names of the Jazz musicians.

We use the JavaScript port of Quicksilver string ranking algorithm, which adds score() method to String prototype, to filter the items.
Here's how the smartAutoComplete method is called on the field, with our custom filter function:
  $("#jazz_musicians_field").smartAutoComplete({
        source: [
          "Scott Joplin",
          "Charles Bolden",
           //snip
        ],

        filter: function(term, source){
            var filtered_and_sorted_list =
              $.map(source, function(item){
                var score = item.toLowerCase().score(term.toLowerCase());

                if(score > 0)
                  return { 'name': item, 'value': score }
              }).sort(function(a, b){ return b.value - a.value });

            return $.map(filtered_and_sorted_list, function(item){
              return item.name;
            });
          }

        });
Do more with Events
Smart Autocomplete was written following an event-driven approach and therefore it emits events at the every major step in its process. You can bind handlers to these events similarly to other jQuery Events. Also, it's possible to cancel the default behavior on events by calling ev.preventDefault() method. This makes extension and customization of Smart Autocomplete so easy.
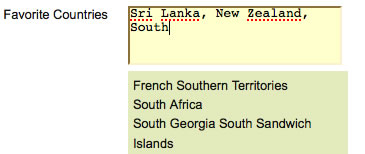
In example 6, we make use of the evented model of Smart Autocomplete to build multi-value selector.

Let's see how the implementation is done:
  $("#textarea_autocomplete_field").smartAutoComplete({source: "countries.json", maxResults: 5, delay: 200 } );
  $("#textarea_autocomplete_field").bind({

     keyIn: function(ev){
       var tag_list = ev.customData.query.split(",");
       //pass the modified query to default event
       ev.customData.query = $.trim(tag_list[tag_list.length - 1]);
     },

     itemSelect: function(ev, selected_item){
      var options = $(this).smartAutoComplete();

      //get the text from selected item
      var selected_value = $(selected_item).text();
      var cur_list = $(this).val().split(",");
      cur_list[cur_list.length - 1] = selected_value;
      $(this).val(cur_list.join(",") + ",");

      //set item selected property
      options.setItemSelected(true);

      //hide results container
      $(this).trigger('lostFocus');

      //prevent default event handler from executing
      ev.preventDefault();
    },

  });
As shown in the above code, we have handlers bound to keyIn and itemSelect events. Lets try to understand the roles of these two handlers.
Smart Autocomplete plugin stores the context data on an event using a special smartAutocompleteData object. Default actions use these context data on its execution. For example, default keyIn action, gets the query parameter from the smartAutocompleteData object of the event.
To implement multi-value select, we need to set the last phrase entered (text after the last comma) to the query parameter, which is passed to default keyIn action. The custom handler we've defined for keyIn event does that by overriding the smartAutocompleteData object's query field.
The itemSelect handler we defined, will concatenate the selected item to the field. However, it also executes ev.preventDefault() to skip the default action from running.
Apart from the two events we've used in the example, there are set of other events available to use. You can find the complete list in the README.
Digging Deeper
In this post, I only highlighted the most important features of the Smart Autocomplete plugin. You can learn more about plugin's capabilities by reading the README and also the Specs (which is available in specs/core/ directory of the plugin)
As always, I encourage you to fork the plugin's code from the Github repo and modify it for your requirements. If you feel your changes can improve the plugin, please feel free to send a pull request via GitHub.
Also, if you run into any issues in using the plugin, please report them to GitHub issues.